

Admin App User Guide
The Admin App User Guide is designed to help Primavera clients utilize the Admin App by providing step-by-step navigation, tips and insights.
Please note that your user type and permissions determines if you have access to the Admin app. If you have questions regarding your access to Primavera's Admin App please contact your organizations administrator or contact our support team at at 888-667-2219 or support@primavera.care.
You can click on the topic you would like to view in the Table of Contents.
Table of Contents
Steps to Add New Employee/User
Part 1: General
Employees
Description: List of employees associated with your Primavera account.

Features:
1. Option to search for employees name.

2. Sort employees by All, Active or Inactive.

3. Option to Edit, Change Password, Email Subscription or edit Permissions. Note employee has to be selected by checking box next to employees status to complete any of these options.

4. Option to export list of employees.

Steps to Add New Employees/User
Step 1: Click the New button
Step 2: Click Add Employee button
Step 3: Enter New Employee information. (Note: First Name, Last Name and Email Address are required to save new employee record)
Step 4: Click Save. New employee will receive automated email from Primavera with login credentials and steps to setup password.
Steps to Defining Permission of User
Step 1: Select Users Name
Step 2: Menu will populate on right hand side. Click the 3 dots.
Steps 3: Click Permissions.
Step 4: User Roles will show. Please click edit roles button to view all available permissions.
Permission Types Include:
- Admin - Full Access to Administrator application. Including ability to add and manage
users. - Analytics - Full access to Analytics application.
- Telehealth/Connect - Full access to Connect App, telehealth and Remote Patient Monitoring App.
- Case Management - Full access to case management application.
- Clinical - Group of users with clinical knowledge or permission for all apps.
- Data Science - Full access to data science tools, manage data sets and reports. Special
permission for people who know how to work with Pivot tables or build
custom reports. - Executive - C-level access of organization, such as CEO, CTO, COO, etc, this user has
access to the dashboard and reports that other users do not. - Financial - Full access to see financial data from payors from any apps.
- Owner - Organization Owner, super admin.
- Prescriptions - The user can see and prescribe medications from any apps.
- Scheduler - Full access to the Scheduler Application.
- Tasks - Full access to see Tasks module in all apps.
Step 5: Select permissions that apply to user. Permissions selected indicated by blue check mark.
Step 6: Click the Save button.
Audit Trail
Description: Report showing employee activity by date.

Features:
1. Option to sort patients by Data Range, Search by Employee Name, Association Type or Event.

2. Toggle between different view options.

3. View audit trail activity details.

Updated Information details will show on a pop up once button is clicked.

Location/Assigned Clinics
Description: Tool to add or manage existing organization locations available in your Primavera platform.
Features:
1. Option to Add, Edit or Delete a location or clinic.

Note if you add or edit a location, the below screen with pop up where details will need to be added. Click the save button to save new locations or edits.

Consent
Description: This is where you can edit the Consent form will show up to the Patient at receive a Survey Message or Videocall. Note once consent form is edited, click the save button.

Upload Patients
Description: Tool to upload new patient records to your Primavera platform.

Steps to upload new patients:
1. Select a file by clicking on the browse button. Once the CSV file is selected, click the continue button.


2. Complete the mapping of your file. Once mapping is complete, click the continue button.

3. A list view of the patients you are importing will then show. Click the import button to complete patient import.


Part 2: Case Management
POC
Description: Setup and manage POC (Plan of Care) that will be available to assign a patient case. Easily edit Systems, Understanding, Final Rating and Predispositions.

Cases
Description: Configure and manage your Cases setting that show in your Case Management App.

Features:
1. Option to add new Cases Status.

Add a case status by typing new status where it says Create New Status. Click the Add button to add new case status type.


2. Option to Edit or Delete Case Status.

3. Option to add new Case Types.

Add a new case type by typing new case type where it says Create New Status. Click the Add button to add new case type.


4. Option to Edit or Delete Case Types.
5. Option to add new Referral Sources.

Add a new Referral Source by typing new referral source where it says Create New Referral Source. Click the Add button to add new referral source.


6. Option to Edit or Delete Referral Sources.
7. Option to add new Referral Purposes.

Add a new Referral Purpose by typing new referral source where it says Create New Purpose Source. Click the Add button to add new referral purpose.


8. Option to Edit or Delete Referral Purposes.
9. Option to add new Admission Types.

Add a new Admission Type by typing new admission type where it says Create New Admission Type Click the Add button to add new admission type.


10. Option to Edit or Delete Admission Types.
Facilities
Description: Tool to add or manage existing facilities available in your Primavera platform.

Features:
1. Option to Edit or Delete Facility. Note facility has to be selected by checking box next to facility name to complete any of these options.

2. Export list of facilities.

Part 3: Analytics
Merge Patient
Description: Tool to merge patient records together.

Features:
1. View past merge request.

Steps to Merge Patient Records:
1. Add Merge Patient Source. This is the first patient you want to merge.

2. Add the Destination. This is the patient you want to merge the source patient together with.

3. Type in Reason

4. Click the Merge Patients button.

Note once you click the Merge Patients button the source patient will be removed from the platform.
System Jobs
Description: Tool to run specific jobs that the system performs based on a schedule or manual action. Jobs available are specific for each organization.

Features:
1. Option to Search for a System Job.

2. Option to Add, Edit or Delete Job.

3. Option to sort jobs by Automatic, Manual or remove these filters.

4. Resume Job or Execute Job under the Actions column.

Email Events
Description: Tool to manage your users email notifications based upon platform events. Click the Save button to save email subscriptions.

PCP Mapping
Description: Tool to manage PCP (Primary Care Provider) mapping within the system. This tool would be used for the data received from a payors if it does not reflect an identifier or something we can map one to one, but management needs to see data that belongs to specific PCP, in order to do that, on each import we ask clients to review this mapping and specify by they contract with Payor, what number each belongs to specific provider.

Features:
1. View Missed Mapping and option to Edit if missing mapping is available.

2. Search PCP Mapping by provider name.

3. Option to Edit existing mapping.

Note once you click the Edit button a window will pop up and allow you to edit the Provider ID, Last Partition Time, Payor, Locations, County, Financial Class and/or Provider.
Risk Algorithm
Description: Tool to activate Risk Stratification of patients within the Analytics app.

Note you have to options to use for your Risk Stratification:
1. John Hopkins ACF System: Industry standard criteria for moderate or high risk patients
2. Primavera: Customize the criteria of what patients are considered moderate or high risk patients.

Steps to activate John Hopkins ACG System Risk Stratification:
1. Click the Activate button.

2. A pop up window will then ask you to confirm that you want to activate the John Hopkins ACG System algorithm. Click Confirm.

Note the you will be able to tell that the John Hopkins ACG System algorithm is active by the green check mark and active next to title as shown below.
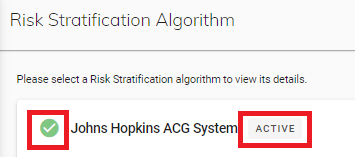
Steps to activate Primavera Risk Stratification:
1. Click the Activate button.

2. A pop up window will then ask you to confirm that you want to activate the Primavera algorithm. Click Confirm.

Note the you will be able to tell that the Primavera algorithm is active by the green check mark and active next to title as shown below.

HEDIS Measures
Description: Tool to add or manage your organizations HEDIS measures that will show in your Analytics app.

Features:
1. Search for a existing measure.

2. Option to Add a new measure.

3. Option to Edit or Delete existing HEDIS measure. Note the HEDIS measure has to be selected by checking box next to the Measure in order to complete either option.

Steps to add a new measure:
1. Click the Add button.
2. Add HEDIS Measure window will populate. Option to add a Description, Weight, Period (Number of Months), Gender, Min Age, Max Age, CPT, HCPCS and set Star Thresholds.

3. Once you have entered the HEDIS measure details, click the Save button.

Benchmarks
Description: Configure or manage existing Performance KPI Benchmarks.

Features:
1. Option to Edit or Delete existing Benchmark.

Note once you have editing Benchmark, click the Save button.
2. Option to add a new Benchmark.

Steps to add a new Benchmark:
1. Click the Add a Benchmark button.

2. Select the corresponding Benchmark Template from drop down menu.

3. Type in the new Benchmark name. Note this will have to match the Performance KPIs available in the Analytic app.

4. Type in Min and Max Benchmark values

5. Option to add multiple new Benchmarks by clicking on the Add a Benchmark button and following steps 2-4 again.

6. Click the Save button to add new Benchmark.

Part 4: Datasets
Validate & Promote
Description: Tool to validate and promote new data into production.

Steps to Validate Data:
1. Select file by click on it.

2. Click the Next button.

3. Screen will then show breakdown of data including Indicator and date.
4. Option to filter down by Payor or Source.

5. Once you have validated the data and are ready to promote to production, click the Promote button.

Promoted
Description: View log of promoted data that is available within your Primavera app. Report includes the date, time, user, email and status of promoted data.

Note option to expand and view addition details of what type of data was promoted to production by clicking on arrow.

Part 5: Connect
Message Templates
Description: Add and Manage existing SMS and Email templates that are available within your Connect app.

Features:
1. Search template by name.

2. Sort existing templates by All, EN, ES, All, SMS or Email.

3. Option to Edit or Delete existing template. Note the template has to be selected by clicking on the name in order to complete either option.

4. Option to Add new Template.

Steps to add new template:
1. Click the Add button.

2. Window will pop up where you can enter the Name, Select the Type, Select the Language and enter the Message.

3. Click the Save button to add new template.

The new template will now show on list view of Templates and will be available within your Connect app to send via SMS or email to patients.

If you have additional questions please contact our support team at 888-667-2219 or support@primavera.care.
Comments
0 comments
Please sign in to leave a comment.